UK2000 – Gatwick Xtreme v3 for FSX

Gatwick airport, EGKK, is located approximately 46 kms south of the city of London in the United Kingdom. Originally opened in the 1920’s it served as an aerodrome up until 1933 when it was approved for commercial flights. They were eventually halted in 1936 after two fatal accidents called into question the airport’s safety. Between 1936 and 1958 it was used as a civilian airfield and as an RAF base during the Second World War.
In 1958 it was officially reopened by Queen Elizabeth II for commercial use and since then it has grown in importance and now holds several notable distinctions; it is the second largest and second busiest airport in the United Kingdom and holds the number one spot as the world’s busiest single-runway airport. It utilizes runway 08R/26L which is 10,879ft long for normal operations and 08L/26R as a taxiway. If required, 08L/26R can be brought into service in approximately 15 minutes when 08R/26L is taken off line for maintenance or an accident. The airport has two terminals which together handle about 33 million passengers per year travelling to over 90 countries.
Installation
After making the purchase I was provided with a link to retrieve the scenery file which is a modest 77Mbs. When I went to do this I found out that I needed to have an account to log into the developer’s site. As this was my first UK2000 scenery I did not have one. On the login page new users can request an account, this opens up a short form where you provide your purchase information, submit the form and then wait for a reply. Within a few hours I was provided with the necessary credentials to log in and retrieve the scenery file and product keycode. I was very impressed with how quickly they responded.
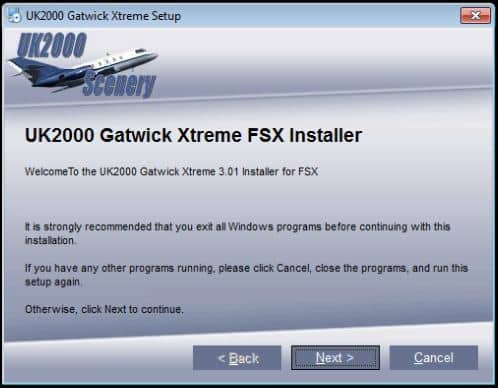
The installation of the scenery is straight forward. You run the installer executable file, enter your product keycode, choose and confirm the installation path and let it continue. The final step is adding the scenery to the FSX scenery library, you have the choice of adding it manually or letting the installer do it for you.

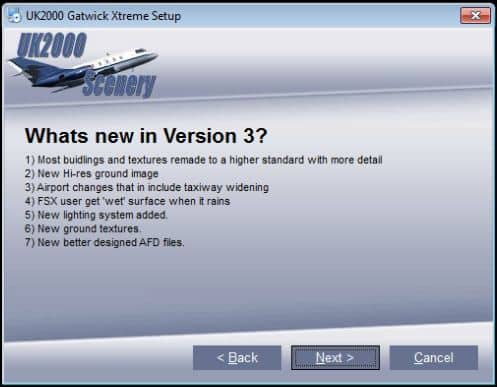
I’ve included a screenshot which highlights what is new in version 3.

Configuration
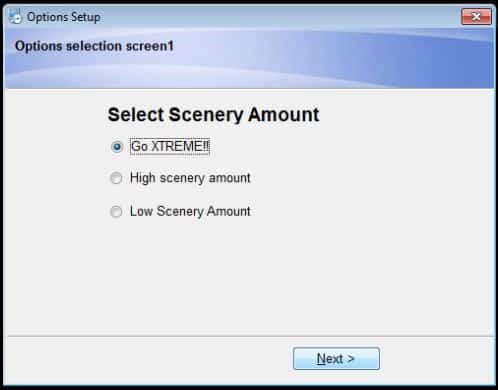
Your first chance to configure the scenery is immediately after the installer has finished. You will be presented with a page that offers three choices; Low scenery amount, High scenery amount and Go XTREME!!. I selected “Go XTREME!!”. After making my choice I was presented with a second screen where I could select or deselect specific options.


Everyone is running different hardware configurations so I strongly suggest experimenting with these to come up with the best balance of detail versus performance. If you change your mind about your configuration choices this screen can be accessed via the UK2000 program group created at the time of installation.
A quick word about product support. While I was testing the scenery I had occasion to contact them via email and have to say that they always responded in a timely fashion and were very helpful.
Documentation
With the scenery comes a 16 page manual which includes information for both the FSX and FS2004 versions of the product. Much of what is written pertains to both versions however if the information in the paragraph is specific to a single version it is labelled as such.
So what do they include? They have the usual information such as how to install and uninstall the scenery, recommended settings and known bugs. They also explain the two aircraft docking systems modelled at Gatwick plus a little bit about the scenery animations and configuration options.
My overall impression of the manual is that it could have included more information about the scenery configuration options. It might also have been an easier read if each flightsim version had it’s own dedicated subsection where specific issues were addressed or expanded on.
Charts are not included but were easily found by doing a search on the net.
Scenery
This UK2000 Gatwick Xtreme v3 scenery is a very detailed recreation of Gatwick airport and is available for both FS2004 and FSX however my review is of the FSX version.


Buildings
The most prominent structures at Gatwick are the two passenger terminals; the North and South Terminals. Branching out from the terminals are six piers that allow the passengers access to the aircraft via jet ways. Â Each terminal appears to be a collection of smaller buildings interconnected to form a terminal complex. Up close the details, especially those in and around the jet ways really showcases all the hard work put into this aspect of the scenery.


In addition to the terminals the airport contains the usual array of structures such as the control tower, fuel farm, maintenance hangar and cargo area.
Overall the buildings at Gatwick are very well done with lots of attention to details, crisp lines and good colouring.


One unique structure at Gatwick is the air passenger bridge which was built in 2005. It is the world’s largest air passenger bridge spanning taxiway L to connect the North Terminal building and Pier 6.

My only criticism with regards to the buildings has to do with the lack of rooftop details. I feel that there could have been more done in this area as they are definitely lacking. You can see in several screenshots that the roof graphics show objects some of which appear to be roof mounted HVAC systems but none have been modelled.


Ground textures
I thought that the hard surface and grassy area textures were all very well done. Again you can see their use of high resolution textures and muted colours throughout giving all of these areas a true to life look. On the hard surfaces they included subtle details like embedded lighting fixtures and drainage hole covers. Along the runways edges they added long grass textures that help reduce the flat look often seen on the grassed in areas between runways and taxiways.


This is a busy airport with lots of air traffic and you clearly see the effects of that throughout. From the rubber marked touchdown zones to the dirt and fuel stained aircraft parking spots it is all recreated just the way you’d expect to see it in the real world.


When you download the scenery there is an additional option “Transparent Grass” available. This gives you FSX/FS2004 default ground textures to allow for seasonal changes in the grass textures. Their suggestion is to install them when you fly in the winter months and to reinstall the original product files for all other seasons. I flew in all four seasons and did not see a need for them and preferred the look of the original scenery files. Should you decide to install the transparent grass option they will overwrite the previously installed files so if you want to return to these original files you will need to do a full reinstallation of the product.
The one part of the ground textures that I did not like and I have made this same observation with other airport sceneries from other developers was how they recreate the large parking lots often found at airports. The fact that they are simple flat photo scenery graphics is disappointing to me. They put so much care and effort into producing extremely detailed airports and then these large parking lots that are so visible because of their size appear as flat images. Perhaps it is a performance issue, if so I feel that they should include 3d vehicles and have it is an option to either enable or disable them in the scenery thus giving the user the choice.

The airport is located in an area that is primarily rural in nature so it blends in quite well with the surroundings.
Objects/vehicles
These are such an important part of any scenery package and Gatwick being a very busy place I was expecting to see lots of both. The developers did a great job here making this aspect one of the major highlights of the package. It is the combination of the high quality and variety of both static and animated objects/vehicles that led me to that conclusion.
I like to get in close when I do my reviews to check out the quality; if it looks good that way it will look good when observed from normal distances. I was very impressed with the modelling. Some outstanding examples were the combination chain link/steel panel fencing, the approach lighting with localizers and the signage at various aircraft parking spots. Water faucet symbols were clearly visible on some of the information signs.


These same observations and comments hold true for most of the vehicles. Again I checked them out at very close range to get a sense of the quality. Most models were detailed with high quality graphics and colouring. They also include lots of variety in the vehicle types. For similar vehicle types they varied colours and logos.


Animated traffic is another part of the scenery package that raises the bar on the level of realism just that much higher and like the static vehicles the quality and variety are quite good.
In addition to all the road traffic Gatwick has an elevated monorail system that connects the two terminals and high speed trains running to the Gatwick Airport Rail Station which connects to the South Terminal. Rail traffic can be seen running on both these routes at regular intervals.


Docking systems
As an added touch of realism they’ve modelled two visual docking guidance systems at Gatwick; the Safedock and the PAPA board system. Which one you encounter depends on the gate or stand you happen to be at. Both are explained in the manual. I have seen and used the more common Safedock system at other airports but this is the first time I’ve encountered the PAPA – Parallax Aircraft Parking Aid system. The differences are that Safedock is an electronic guidance system while the PAPA system uses no electronics or moving parts.
I will give a quick explanation of the PAPA system. It consists of a box with a slit and a white tube that appears to move as the aircraft moves. On the face of the box there are marks labelled with the various aircraft types, when the white tube lines up with the appropriate mark you are at your designated spot. At Gatwick this system is augmented with AGNIS – Azimuth Guidance for Nose-In Stand. This system has two lights which can be either red or green. If both are green then the pilot is on the stand centerline.


The Safedock system uses an electronic board that will identify the aircraft type and then provide visual clues for azimuth and distance up to the stop point.

They were designed to work with FS default aircraft so you may have to make some allowances for payware aircraft in order to get them properly lined up and parked exactly where you want them. As the manual explains their ability to line up the aircraft is based on the cockpit eye position and this varies with each aircraft and again may vary with each designer. The Safedock system always worked regardless of the aircraft type however the PAPA system took some getting used to and I found that what the board was indicating didn’t always match where I expected to be so I had to learn to adjust accordingly.
Night
Flying at night brings out a whole other side to any scenery and with it new challenges. Â It is important that the developers pay just as much attention to recreating a realistic night time environment and looking at Gatwick it quickly became obvious that they did just that.
There are three main areas I look at; apron lighting, ground and approach lighting and building lighting.
I was very impressed with the ground and approach lighting; at ground level this has to be some of the best I have seen in any scenery package up to now. The glow of the lights illuminates the ground in the areas immediately surrounding these lights. This gives a very realistic look and effect.
For night time operations the approach lights are a very important feature for any pilot and as you make your approach you are going to be looking for those lights in the distance. At close range they appeared as nice sharp points of light and not overly bright but from a distance they were very easy to spot.
Apron lighting is another important aspect and this airport has quite a large area dedicated to parking and taxiing. Once again I have to say that what they have achieved here is a look that is very realistic. This was done by varying both the intensity of the light and how it was diffused.


Building lighting done correctly goes a long way in enhancing the night time scenery. I found that they had a good mix when it came to interior lighting, not all the windows were lit up so once again it was not overdone and up close it was as if you were actually seeing inside. Exterior lighting is also important and here to you can see that they have the light illuminating the sides of the buildings and nearby ground.
Approaches
As with every airport I review I always attempt a variety of different approaches on the available runways using the navaids. Â Everything lined up as expected and I was successful in using this aspect of the scenery.


Final Thoughts
This was my first exposure to any of the UK2000 scenery products and I must say that I was very impressed with the overall appearance and performance. I knew that Gatwick was a very busy airport and even with my preferred scenery option setting at “Go XTREME!!” it continued to give me very good frame rates.  I would definately recommend this product.
My Ratings
Installer: Very good. Easy to use.
Documentation: Good. Manual is informative but somewhat jumbled. Configuration could have been better explained. No charts.
Modelling: Very good. Lots of details with good performance.
Extras: Configuration utility included.
Download Size: FSX 77Mb
Price: EUR 16.56
Link: http://secure.simmarket.com/uk2000-scenery-gatwick-xtreme-v3.phtml
Test System:
Intel i7 950 OC @ 4.2 Ghz, 6 Gb RAM, ASUS 480GTX w/1.5Gb video, Win 7 Ultimate 64, FSX w/acceleration, Ultimate traffic 2, REX Overdrive, GEXn, UTX, AES 2.10
Richard Desjardins


0 Responses
Rick: Snap http://simflight.com/2011/01/05/review-uk2000-scenery-gatwick-xtreme-v3/
PeterH
And what’s wrong with having two different peoples’ opinions on the same subject, hmm? 😉
Rick I was not upset at all! As Miguel says two points of view can be better than one. The two reviews complement each other and yours is excellent!
Regards
PeterH
I should explain theat “snap” was an olde english children’s card game where you and your other players placed a series of cards face up in front of themselves and when you had a match eg 2 x Aces etc the first one to yell “snap” was the winner!
Regards
PeterH
As per my previous comment, I actually think it is a good idea to have more than one review of the same product, regardless of whether it is on the same site or not. I always look for more than one review of an add-on, game or whatever, simply because different peoples’ opinions vary on different things and, when you boil it down, a review is simply someone’s opinion.
Anyone else got any thoughts on this?